The Ultimate Guide to Toyota 4Runner Lift Kits

While the Toyota 4Runner is a very good looking and competent SUV, it is a blank canvas waiting to be modified to perfection. One popular option is adding a lift kit. Regardless if you want to lift your 4Runner to be the best looking one in the mall parking lot, or you need to be able to tackle the great outdoors in your next overlanding adventure, there are plenty of ways to get that done.
Before we get into the whole lifting part of this, we need to go over some key terms so you can become an expert! After that, I’ll toss some examples at you, and hopefully you can determine which way is the best way to lift your 4Runner.
Technical Info and Terminology
Coilover: A coilover is the front coil spring and shock assembly together as one unit. A typical spring and shock suspension are two separate parts.
Shock: A shock is an oil or gas filled piston that's designed to compress and expand with suspension travel. They are designed to absorb impacts to give you a smoother or stiffer ride, depending on the type you choose. You can see these inside your springs.
Upper Control Arms: UCA are at the front of your independent front suspension (IFS). They are mainly responsible for the vertical alignment of the front spindles. They generally are not load-bearing.
Lower Control Arms: LCA are also part of the front IFS. These work together with your UCA, but these see most of the load-bearing.
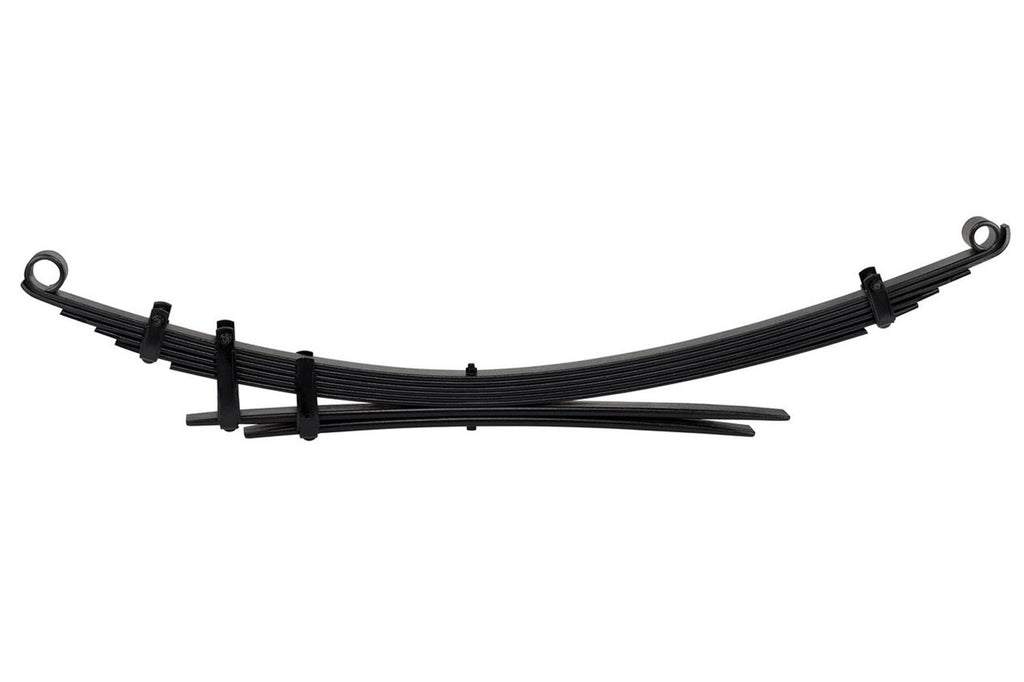
Leaf Springs: These are one of the oldest suspension designs. Leaf springs are made of a number of strips of metal curved slightly upward and clamped together one above the other. They are found at the rear of many vehicles, including modern trucks, but the 4Runner dropped them in 1990.
If you are interested in learning more about leaf spring terms, you may hear “add-a-leaf” and “leaf pack” used as well. Add-a-leafs, or AALs, are additional springs that are excessively arched to provide additional lift or support to the rear of vehicles using leaf springs. Leaf packs are a full set of replacement leaf springs that are designed to provide more lift and/or to be able to increase payload capacity. Again, this is something you most likely don’t have to worry about in your 4Runner, unless you have a classic.
Alignment
We have now covered all of the parts, but we need to talk about alignment. Alignment is more than just making sure your steering wheel is pointing the correct way. Even if your alignment is a hair off, it will cause uneven wear and tear on your tires and suspension.
Caster: This is the angle that your front tires are tilted in relation to the steering axis.
Camber: The angle that your tires are in relation to the vertical axis when viewed from the front of the vehicle.
Toe: The angle at which your front tires turn in or out in relationship to each other.
Types of Lift Kits - Front
Now that we’ve made it through the terms, let’s focus on the meat and potatoes: the different options you have for lift kits on your Toyota 4RUnner. For the front of your SUV, there are three main ways to achieve lift: spacers, coils, and coilovers.
Spacer Lift Kits, which are also known as leveling kits, leveling spacers, or spring blocks, are the most affordable way to get a fixed amount of lift out of your SUV. This is achieved by literally adding a spacer between the body of your SUV and the suspension.
![]()
The biggest upside to this type of lift is that you do not need to invest in any other suspension parts which makes these pretty inexpensive. The biggest downside is that they are not suitable for serious offroading. They are best for looks and lighter off-roading and give one to three inches of lift.
Here are some popular options that other 4Runner owners are running on their rides.
Slightly jumping ahead to include some stuff for the rear as well, but this kit from Rough Country will give your 4Runner 2 inches of lift all around. You can choose between an aluminum finish, or anodized red. You can grab these for about $130.
Toytec makes multiple suspension components for our SUVs to cover the spectrum of almost anything you could need. This is their two and a half inch spacer kit. At $140, they are relatively inexpensive, and they are designed to work with stock shocks. They also offer 2.5 and 3 inch spacers as well.
While $130 to $140 isn’t exactly expensive in terms of vehicle parts, if you’re truly on a budget, Supreme Suspension Store offers a 2 inch lift for just under $90. Unlike the other two kits, this is just the front, so you will need to pair it with a rear kit which we will get to in a later section of this article.
Coil and Coilover Lift Kits have to deal with actually replacing your stock suspension pieces. As stated in the terms, a coilover kit is a single unit containing your spring and shock together. A coil is just the coil. However, they both achieve the same end goal.

Replacing the coils can give some change, but for the best performance, lift, and off-road capabilities, you’ll want to look at coilover kits. While they are the most expensive, you get what you pay for. Not only is it the safest way to get the most lift, but if a company is pairing a spring and shock together, you can be assured they will not only work well together, but have a better warranty compared to various parts you may put together. It’s also hard to beat the “plug and play” nature of a coilover kit.
Now that you know some stuff, here are some of the popular coil and coilover kits for the 4Runners.
Coils are generally inexpensive as well, like these taller springs from Toytec for just under $170. These springs alone will give you 2.5 to 3 inches of lift, depending on the generation of your 4Runner. Always be mindful when buying coils to make sure the shocks you have work with them.
These guys are known for suspensions components for all makes and models, so they know a thing or two about springs. These springs give you 2.75 inches of lift, but they say they must be used with their shocks. Regardless, you can pick them up for about $180.
Ironman 4X4 Performance Load Coils
Lifting your ride means you get to see a little more of the stuff under your truck. Why not show it off? Ironman 4x4 not only gives you a three inch lift, but the neon green color of these coils really stands out! These are about $225 for the set.
Fox Racing has been in the business for a while, and for just around $867, you can get their Fox Shox 2.0. As mentioned, coilovers do cost more, but they are plug and play for easy installation and readiness. These are adjustable from factory height to two inches.
Bring Eibach to the table again, but this time with their coilover kits. This specific one is for 2010-2021 models, but they have everything to fit whatever model you have, and with a lifetime warranty. Prices are around $899 for this kit.
Types of Lift Kits - Rear
Unlike our pickup brother the Tacoma with leaf springs, the rear of our 4Runners are more along the lines of what you see up front. The biggest difference is that the springs (coils) and shocks are not one unit.
Spacers for the rear are very similar to the ones found up front. Just like the font, I would not consider these for serious off-roading. These will be your most cost effecive means of getting a few inches of lift. For looks and general off-roading, these are the way to go.
![]()
Since spacers in this instance are normally not made of metal, so you’re generally going to find smaller heights such as 1.5 or 2 inches. You might find some that are 2.5 inches or so, but I am not going to recommend them. If you want higher, you might want to look into replacing the springs/coils entirely.
Here are some options for you to consider:
For 1.5 inches of lift, these spacers from Toytec will set you back about $90. It’s a pretty simple product with a pretty simple mission, and Toytec delivers, like usual.
While 1.5 inch is pretty common for spacers, Daystar offers a 2 inch spacer kit. You don’t want to go much higher than this since the spacers are not a more durable metal.
Coils for the back don’t have to worry about a shock going through them, and are actually pretty easy to install compared to the front. Much like the front, different springs will give you different lift.
If you just want to go for 1 inch of lift, you can’t go wrong with Eibach. They also come with a 1,000,000 mile warranty, so basically lifetime. They will set you back only $179.
For two inches of hassle-free lift, Toytech offers these springs. In addition to the lift, you also get a 10% increase in load capacity/spring rate. Yes… That means more junk in the trunk. The pair will cost about $210.
Without an entire suspension overhaul, you don’t want to go more than 3 inches, and that’s where Icon comes in at with their Dual Rate Spring Kit. They are made by Eibach, so if you had any concerns for whatever reason, keep your mind at ease! These will run you about $300.
Rear shocks are not going to cause you to get a different ride height, but they are important to mention if you are planning on lifting your ride. Shock rear shocks work very well for stock ride height. However, since there is no coilover option for the rear, you might want to consider getting a complete kit so you can be sure you are getting spring and shocks that will work well together. Much like rear coils, they are also pretty easy to install compared to the front.

Again, while these will not directly change the amount of lift that you have, let’s take a look at some popular ones.
While these guys cover the front and rear, Falcon Shocks are your best bet if you already have the springs that you want. They offer different 2 inch kits depending on your needs such as if you are going to be towing and hauling, or tackling the great outdoors.
If you have between 0 to 3 inches of lift, and need some good shocks to go with it, Rough Country offers their N3 shocks. For only $100, they are a great option to get you going.
Conclusion
Your Toyota 4Runner is waiting to be lifted and modded, so stop waiting. Keep in mind that an SUV is made to work best from the factory. Changing one component may affect others. Any time you change any component of the suspension, it is good practice to get an alignment to make sure everything works well and lasts long.
Find the kit that works best for your needs and budget. Be safe, have fun, and lift ‘em up!
Need other ideas for your 4Runner, check out our list of awesome 4Runner mods and accessories.
Image Credits:
Lifted 4Runner: Courtesy of Instagram user @gun.rnr
Spacer: Courtesy of Toytec
Coils: Courtesy of Eibach
Coilovers: Courtesy of the Fox Racing Amazon store
Spacer Rear: Courtesy of Toytec
Shocks: Courtesy of Rough Country