3rd Gen TSS Ready (2018+) Grille Installation Instructions
BEFORE INSTALLING YOUR GRILLE, PLEASE MAKE NOTE THE FOLLOWING
1. IF YOU HAVEN'T HAD YOUR TSS SENSOR RECALL TAKEN CARE OF, PLEASE DO SO. WE'VE FOUND THAT IT MIGHT CAUSE YOUR SENSOR TO MALFUNCTION AND TOYOTA WILL NOT SERVICE THE SENSOR IF ATTACHED TO AN AFTERMARKET GRILLE.
2. YOU DON'T WANT TO OVERTIGHTEN ANY OF THE BOLTS, ESPECIALLY THE RADAR BOLTS.
IF YOU OVERTIGHTEN THE BOLTS THAT SECURE THE GRILLE TO THE TRUCK, YOU WILL SCRAPE THE POWDER COATING AND INCREASE THE CHANCES THAT YOUR GRILLE WILL OXIDATE.
IF YOU OVERTIGHTEN THE BOLTS THAT SECURE THE RADAR PLATE, YOU WILL PULL THE PEMS THROUGH AND POSSIBLY BEND THE GRILLE.
Here are the instructions for installing your new grille insert.
Tools Needed
- Flat head screw driver
- Phillips screw driver (or drill bit)
- Rachet
- 1/4 inch socket
- Drill
- 1/4 inch drill bit
- Small pair of pliers
- Dirty rag
- Soft blanket
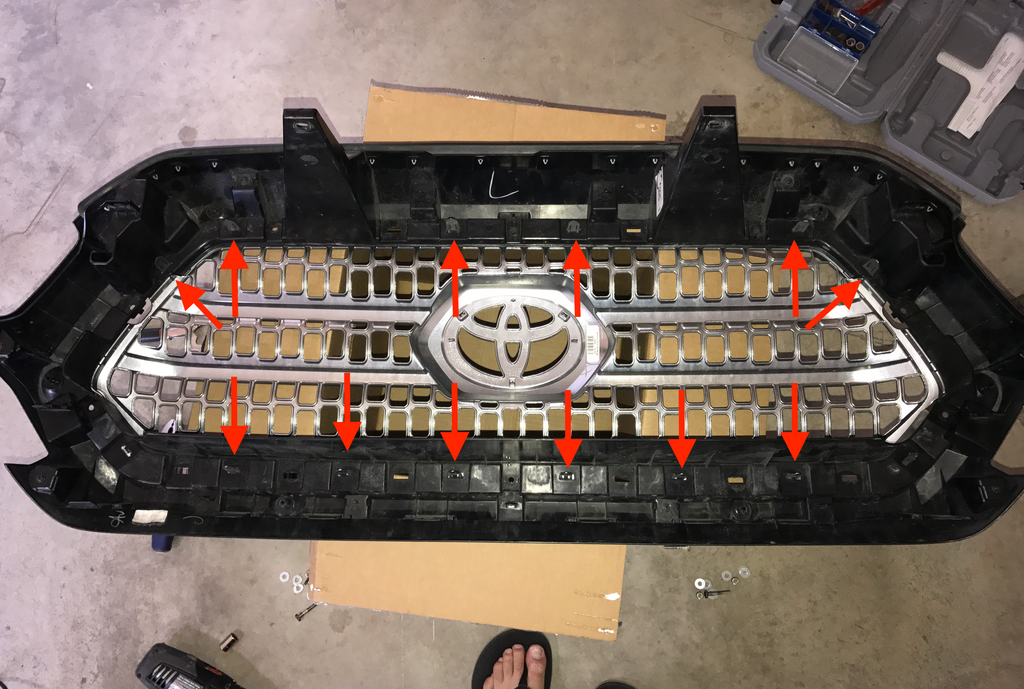
Step 1
Remove the entire grille and outer surround from the truck by removing the two bolts (top two arrows) with a phillips tip screw driver or drill bit and the two push pins (bottom two arrows) with a flat head screw driver. With the two push pins, just pry up the little round tab and pull it out.

Step 2
Grab the top of the grille and start gently wiggling. Once it starts to break free, grab the front and pull straight out.
Step 3
Once the grille has been removed from the truck, lay down a soft blanket (or cardboard if you’re me) and remove these eight screws.

Step 4
Once the screws are out, you need to start popping out the insert and bezel. To do this, you must apply light pressure to the clips while you pull on the outer bezel piece and grille from the front. These tabs will snap off very easily, so be careful. Make sure to get them all!
Step 5
You will have to drill out 8 of the holes with a quarter inch drill bit. Don't worry, this doesn't affect the ability to remount your stock grille if you choose. Drill out the marked holes below and the final two screws go into two of the horizontal slats in the bottom of the grille.

Step 6
Attach the brushed stainless steel back plate to the grille using four of the included locking nuts. You may need to pull the laser paper if yours came with it. That will be the side you want facing out.
Step 7
Attach the acrylic plate to the bottom of the grille by sliding over the two pems. You will need to pull the laser paper off of each side and place the textured side outward.

Step 8
Attach the TSS sensor to the grille, right behind the acrylic plate and step and screw on the two locking nuts.

Step 9
Attach the grille following these steps:
- Start with the top center hole
- Insert the bolt
- Grab the bolt head with a rag and a pair of pliers (to keep the powder coating from chipping off)
- Use the ratchet and 1/4 socket to tighten the bolt from the back of the grille (don’t tighten all the way)
- Go around the remaining 9 holes following these same steps
- Once all bolts are in and lightly tightened, finish tightening all of the locking nuts
Step 9
Reconnect the TSS sensor.
Please note, powder coat will chip like paint. This grille is made out of aluminum and may oxidize if the powder coating is chipped or scratched. If you notice any chips or scratches, please make sure to touch it up with touch up paint as soon as possible.


